During our weekend trips in college times, we often spend so much pocket money than we want to, and we end up saving nothing for the whole month, and of course, this might happen to you. well, Don't worry we have your back The same situation happens when we work with different cloud providers like AWS, Azure, GCP we get huge expenses incurred in using cloud resources and services
so here is the solution Cloud Cost Monitoring
What is it?
It is the practice of tracking and analyzing the expenses incurred in using cloud resources. It involves monitoring, analyzing, and optimizing cloud usage to ensure efficient cost management and budget control.
ok, But how? We use Komiser for this
Komiser is an open-source tool which enables you to have a clear view of your cloud account and gives helpful advice to reduce the cost and secure your environment.
Using Komiser for Cloud Cost Monitoring
Komiser's goal is to help you spend less time switching between confusing cloud provider consoles and have a clear view of what you manage in the cloud. To have quick access to what is important to you. Through this transparency, you can uncover hidden costs, gain helpful insight and start taking control of your infrastructure
To know more about the komiser
Technologies used
Django
AWS
Terraform
Ansible
Komiser (Open source tool)
AWS Services used
EC2 (Elastic Compute Cloud)
VPC (Virtual Private Cloud)
IAM (Identity & Access Management)
ELB (Elastic Load Balancer)
Route 53 (DNS Service - Optional)
S3 Bucket
This project has been divided into 5 parts and each part has a detailed blog
Today we're building Part I:
Let's understand the project architecture and workflow
Here is a diagram of the project we'll be building:

In this workflow, We're using the ready-made Django app , It's a simple todo list application
First, let's clone this app
git clone git@github.com:shreys7/django-todo.git
Django is the web framework for Python, It's used to abstract the complexities, so whatever models we have created in Python it will convert them into SQL commands in which the database understands
In Python we refer to database like models, SQLite is the local database

To learn more about the concept of making migrations, refer to the documentation.

📍Note: models.py is where the models are defined

The folder called migrations was created after running the
python manage.py makemigrations
Now let's create a virtual environment, wondering what is it. A virtual environment is a tool that helps to keep dependencies required by different projects separate by creating isolated Python virtual environments for them
python -m venv ./venv

The above file is created, Now we need to activate the virtual environment created
source ./venv/bin/activate
In case the above command didn't work, I tried using this command, just set the path and activate this will do the work
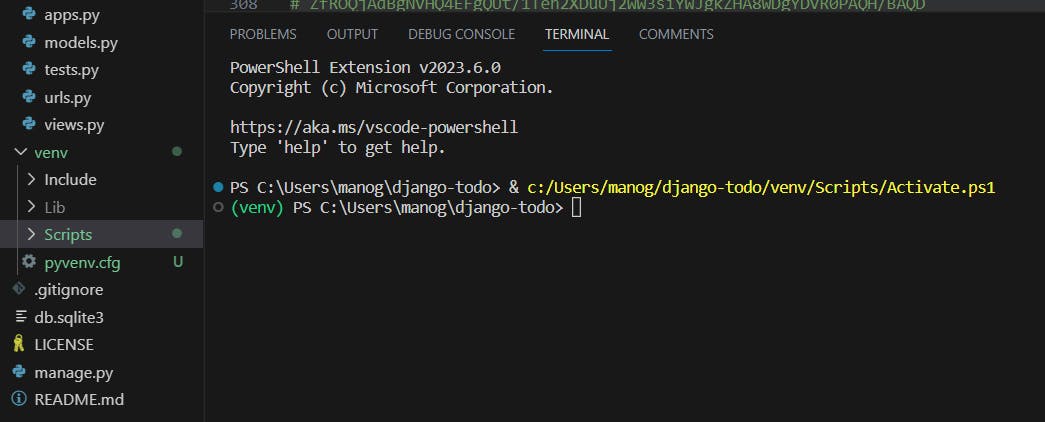
Now after this, we need to generate requirements.txt which contains a list of all the installed packages and their versions in your Python environment. This file is commonly used to manage dependencies in Python projects.
pip freeze > requirements.txt
When we run the command pip freeze, it lists all the installed packages and their versions. The > symbol is used to redirect the output of the command to a file, and requirements.txt is the name of the file where the output will be saved.
📍Note: It's important to run the above command after activating the virtual environment

This is the requirements file created
python manage.py migrate
To apply the migrations we need to run the above command

We need our app to be live so we need to create a username and password for it
python manage.py runserver
The command starts our server

The simple Django-todo is live
Now let's build the docker file
# pull the official base image
FROM python:3.8.3-alpine

# set work directory
WORKDIR /app

# set environment variables
ENV PYTHONDONTWRITEBYTECODE 1
ENV PYTHONUNBUFFERED 1

# install dependencies
RUN pip install --upgrade pip
COPY ./requirements.txt /app
RUN pip install -r requirements.txt

# copy project
COPY . /app

EXPOSE 8000

CMD ["python", "manage.py", "runserver", "0.0.0.0:8000"]
If you're a beginner this reference can help you

so This is the Docker file that we created in the vs code.

we added venv/ to the git ignore file to ignore it. Now, it's time to push the cloned repository to GitHub
 cd django-todo
 git remote -v
 git remote add upstream git@github.com:manogna-chinta/cloud-cost-monitoring.git
 git remote -v
 git status
 git add .
 git commit -m "files-added"
 git push upstream develop
These are the commands required to push, Now let's build the image and run it. For this, we're using killer coda playground. We're using ubuntu os as the default

We just cloned the repo to the killer coda
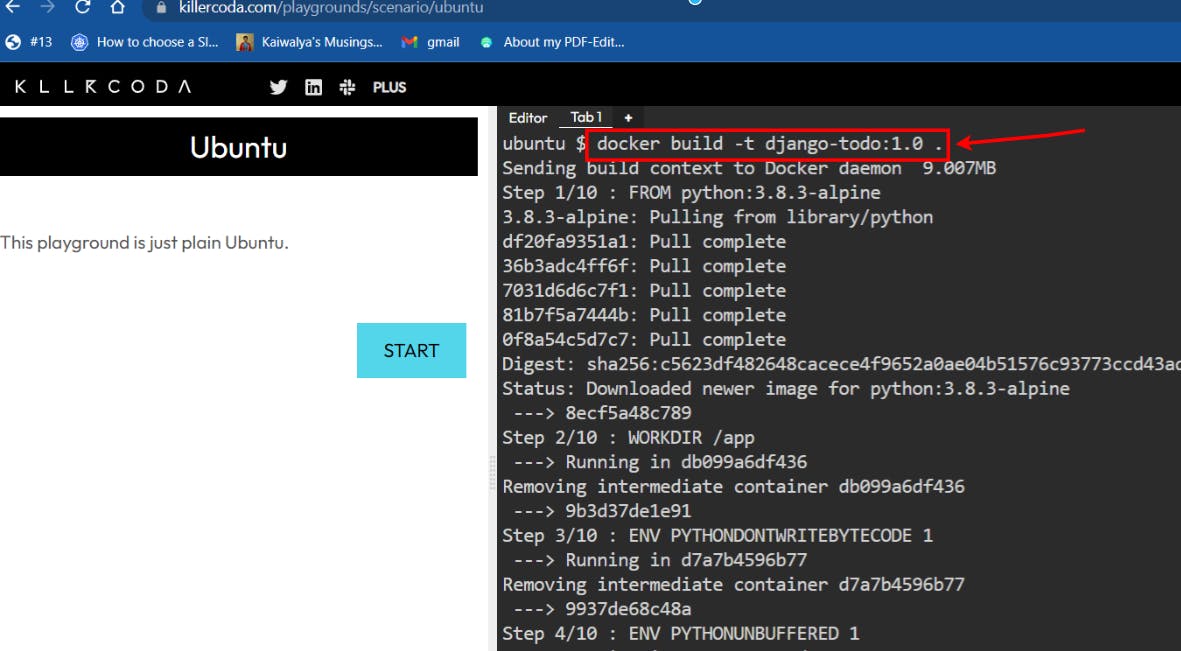
so we successfully built it, for the ones who are new to docker, let me explain the command
-t refers to the tag and we have given the tag name Django-todo, 1.0 is the version we had given and it's completely optional and the dot represents the build context. It indicates that the Dockerfile and any files referenced in it should be found in the current directory.
docker run -d -p 8000:8000 django-todo:1.0
docker run: This is the Docker command to run a container.-d: The-dflag is used to run the container in detached mode, which means it will run in the background.-p 8000:8000: The-pflag is used to map a port from the host to the container. In this case, it maps port 8000 from the host to port 8000 inside the container.Django-todo:1.0: This specifies the name and tag of the Docker image to use for the container.
Now click on the right, select traffic/ports
In the custom port give 8000

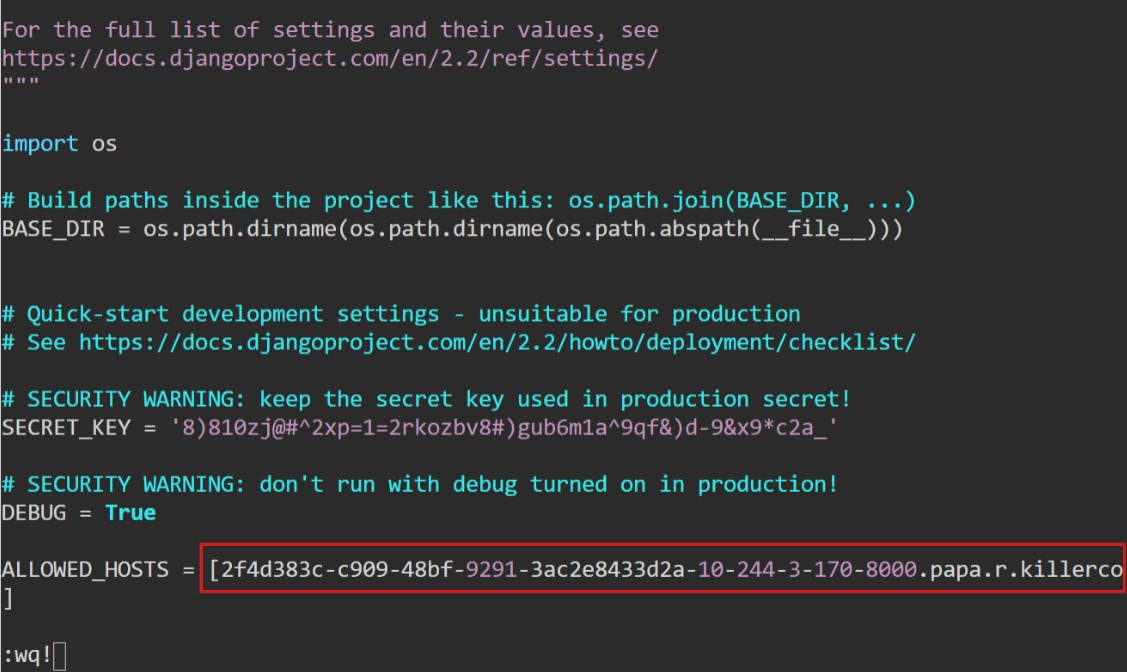
copy the selected text

This will open up like this, select I in the keyboard and we entered the copied text here down below and press ESC and type:wq!
docker run -d -p 8000:8000 django-todo:2.0
Before I tell you anything about Terraform add Terraform by hashicorp extension like this 👇

Also Depending on your operating system, you can download the Terraform and add the path to the environmental variables
📌 Reference Link
For Windows, this video can help you people better 👉 Link

we created Terraform folder and added a provider.tf, resources.tf files in it
Well, what is Terraform?
It is an Infrastructure as a code tool, terraform uses hashicorp configuration language (hcl) and it is cloud agnostic which means write one configuration file and use it with multiple cloud providers, terraform is not language-specific or cloud providers specific
How does Terraform interact with different cloud providers?
There is Terraform registry which contains many providers that Terraform supports, and providers are abstractions of different cloud providers API's. so providers are a logical abstraction of an upstream API. They are responsible for understanding API interactions and exposing resources.
Here's the official documentation for reference
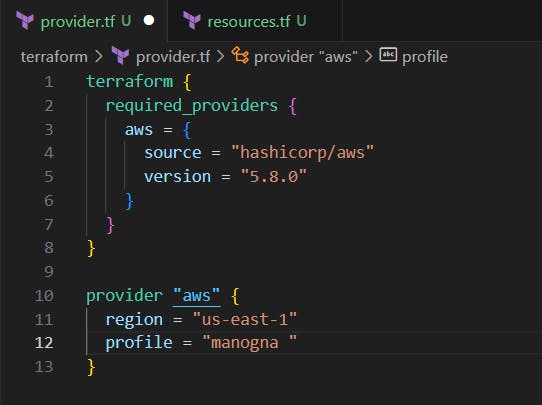
Here we created provider.tf file and now we need to attach an IAM policy
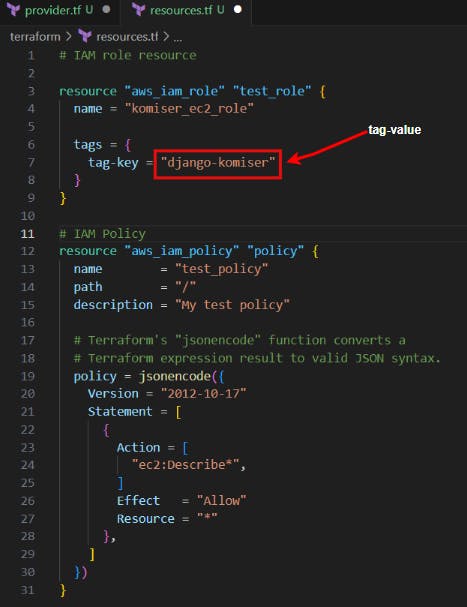
In the resources.tf file we used tag-value because, At the end of the project, we use Komiser to monitor all the cloud resources, tag-value is used by Komiser to structurize these resources to group all the similar resources that have similar tag names together then it knows these are the resources that are provisioned and they are the one I need to monitor, so we will use the same tag-name for the resources komiser can watch later on
Again you people must be wondering, how to code in Terraform since you are beginner, I know we even took help from Terraform docs so look at the reference
Now go to IAM service in aws -> users->Add user (give any name)->Attach policy directly (select AmazonEc2full access) and click on it->copy the JSON format
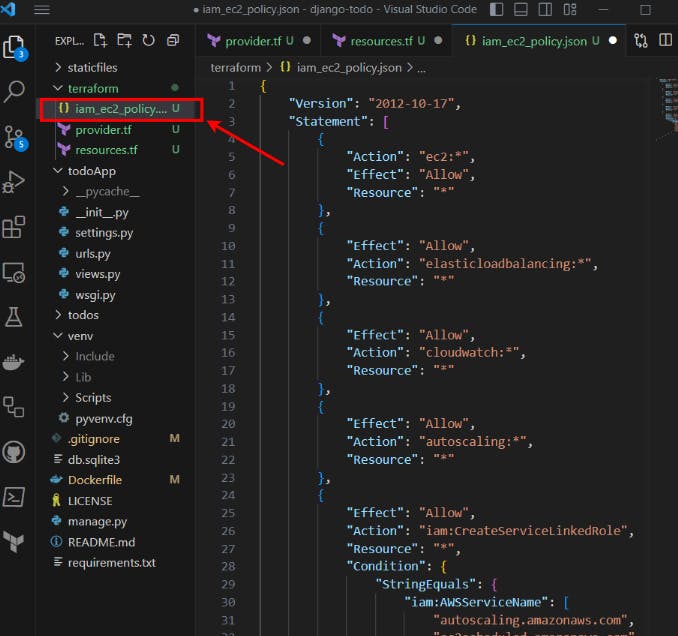
we pasted it here in the above file named iam_ec2_policy.json

This creates the password to login into the AWS console

Here I went to the directory I'm working on i.e, monitoring-cloud-cost and cd terraform and initialized the terraform by doing terraform init
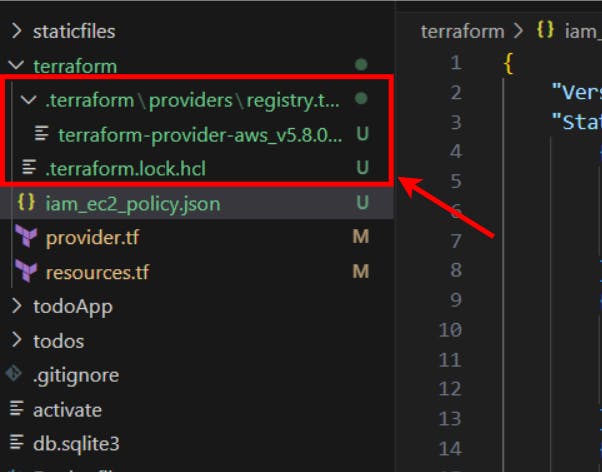
👆 These files get automatically created after Initialising
terraform init: initializes a working directory containing Terraform configuration files
terraform plan: gives you the overview of what you're about to create before applying
terraform apply: It will tell you what all changes terraform is going to do and it will ask you for confirmation to apply those changes
so after successfully running all the above three commands, we get the password 👇

Now sign into the Amazon console using the IAM role and give the following details
Account ID (12 digits) or account alias : (Before you signout copy your ID)
IAM user name : komiser_ec2_role
Password : (password obtained )
#IAM role resource

resource "aws_iam_user" "komiser_ec2_resource" {
    name = "komiser_ec2_role"

    tags = {
        tag-key = "django-komiser"
    }
}
resource "aws_iam_user_login_profile" "komiser_user_profile" {
 user    = aws_iam_user.komiser_ec2_resource.name
}

output "password" {
 value = aws_iam_user_login_profile.komiser_user_profile.password
}

#IAM Policy
 resource "aws_iam_policy" "komiser_policy" {
 name        = "komiser_policy"
  description = "This is the policy for komiser"

  policy = file("iam_policy.json")
}
# Policy Attachment
resource "aws_iam_user_policy_attachment" "komiser_policy_attachment" {
 user       = aws_iam_user. komiser_ec2_resource.name
 policy_arn = aws_iam_policy.komiser_policy.arn
}
Here in the 👆 resource.tf we first created a iam user called as komiser_ec2_role and then we created login profile and password and defined a policy file and attached policy
{
    "Version": "2012-10-17",
    "Statement": [
        {
            "Action": "ec2:*",
            "Effect": "Allow",
            "Resource": "*"
        },
        {
                "Action": "s3:*",
                "Effect": "Allow",
                "Resource": "*"
        },
        {
            "Effect": "Allow",
            "Action": "elasticloadbalancing:*",
            "Resource": "*"
        },
        {
            "Effect": "Allow",
            "Action": "cloudwatch:*",
            "Resource": "*"
        },
        {
            "Effect": "Allow",
            "Action": "autoscaling:*",
            "Resource": "*"
        },
        {
            "Effect": "Allow",
            "Action": "iam:CreateServiceLinkedRole",
            "Resource": "*",
            "Condition": {
                "StringEquals": {
                    "iam:AWSServiceName": [
                        "autoscaling.amazonaws.com",
                        "ec2scheduled.amazonaws.com",
                        "elasticloadbalancing.amazonaws.com",
                        "spot.amazonaws.com",
                        "spotfleet.amazonaws.com",
                        "transitgateway.amazonaws.com"
                    ]
                }
            }
        }
    ]
}
This is the 👆 iam_ec2_policy.json Initially and named as iam_policy.json which we blindly copied the text from aws json format after which we did some changes
until now, we have only created iam_role, let's create EC2 instance
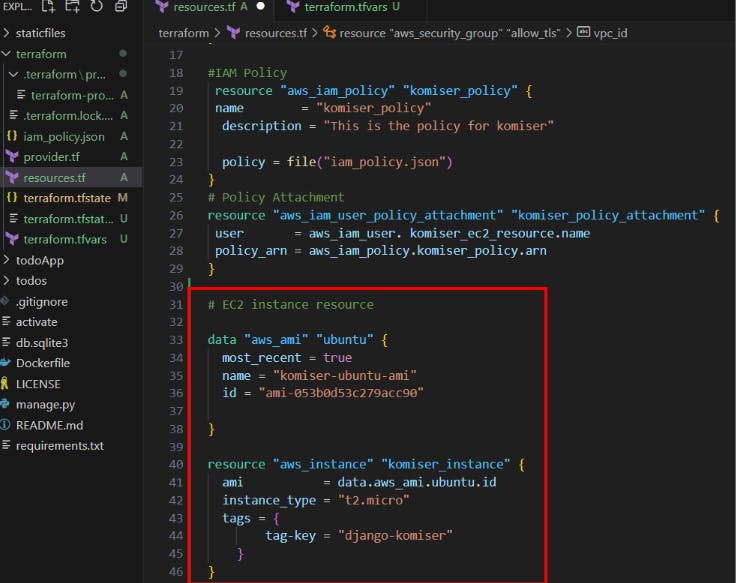
Create an Access Key for komiser_ec2_role from the parent IAM user and provide those credentials in a new file called terraform.tfvars

Now login to the iam account of komiser_ec2_role
📍Reference Link
Now let's create the security group 👉 Reference Link
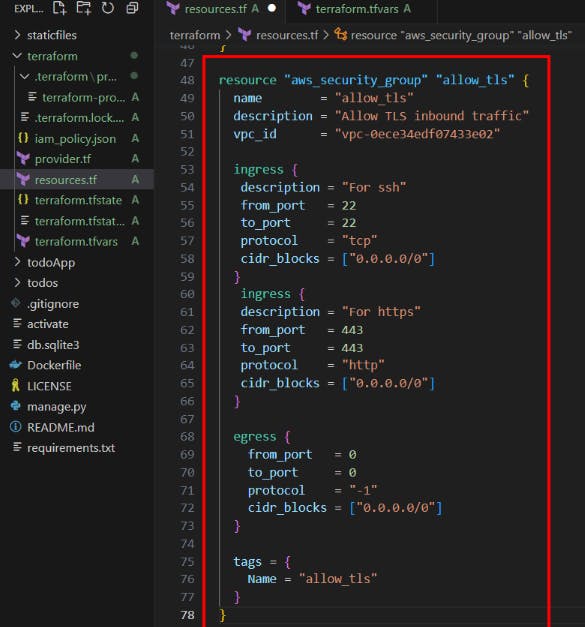

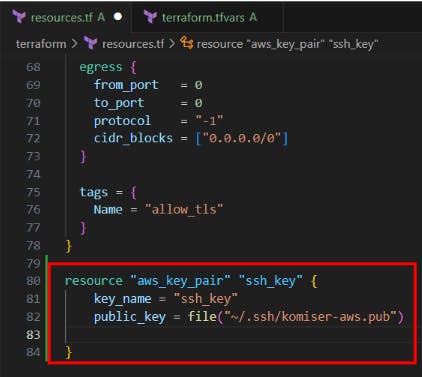
created the ssh_key 👆
Now let's create the resource for the ssh_key 👇
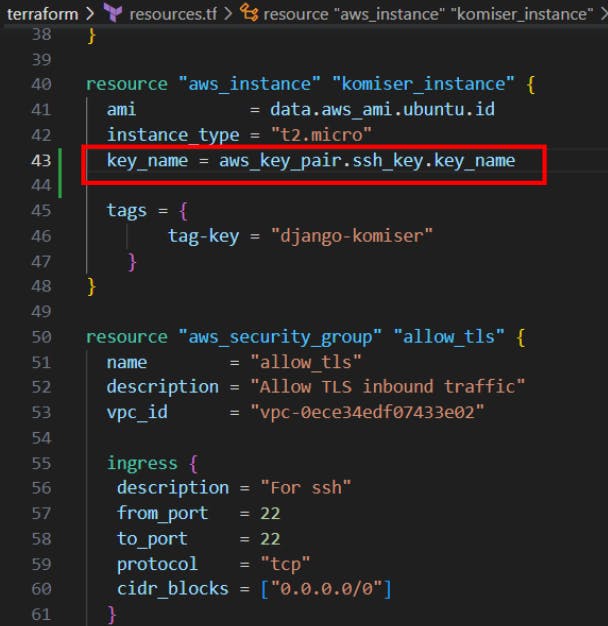
and defined the key pair in the resource instance 👇
Let's do terraform apply and see what happens, any errors thrown? Of course, yes It does happen and I want to keep it raw in this blog so everyone can understand before a successful blog many trials and errors
Now, we have directly given the ami-id 👇
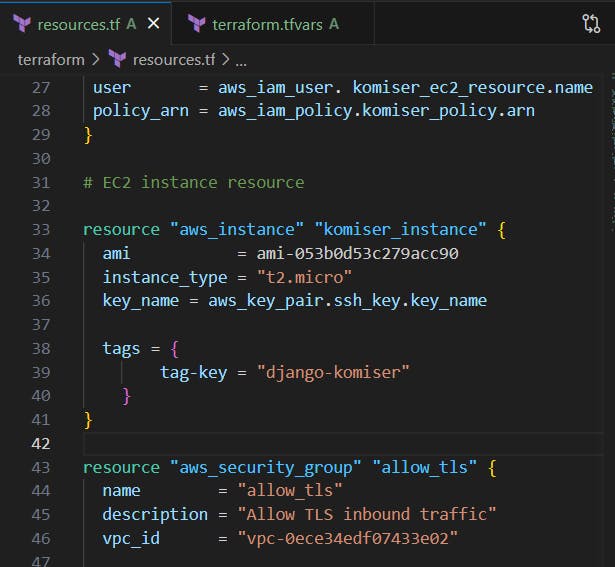
and also we configured the profile for komiser 👇

and changed the profile name to komiser_ec2_role

Now do terrafrom apply , oops we got some errors
well, we will continue this practical in the Part 2 and see how we can tackle the errors.
📍**Resources**:
Part2 Blog :
https://hashnode.com/edit/cll44jy9u000109mp30y9dns8
Kubesimplify Github :
https://github.com/kubesimplify/cloudnative-lab
My Github :
